
Docs / Start here
Getting started with Worlds
What you see on first launch, where your pages are kept, and how to look around a ready-made sample workspace before you start your own work.
If you have not installed Worlds yet, start at Install. This guide describes the Windows app, which is the full app. The Apple and Android apps are newer and have fewer features; the differences are at the end of the page.
First launch
-
The welcome window (it may or may not appear)
If the app is connected to an account server, a Welcome to Worlds window appears once. It has two buttons:
- Start on This PC: start right away with no account. Your pages stay on your computer and work without a connection.
- Sign In or Create Account: only needed if you want to share a workspace with other people. See Account.
Closing the window counts as starting on this PC, and you can add an account later in Settings. If there is no account server, the window never appears and the app opens straight on Home.
-
The empty Home
The first time, there are no pages, so Home shows a greeting for the time of day and suggests three ways to begin: a blank page, a template, or a sample workspace. The buttons are:
- New: opens the menu to create a page, document, presentation, drawing and more.
- Load sample workspace: adds a ready-made student week to try everything (details below).
- A row of Templates: one click on a template creates a page from it.
-
The study question
Once you have pages, Home shows a card that asks Do you use Worlds for school or university? Choose Turn on Study to get subjects, a timetable, assignments and exams, or No, keep it simple. You can change this later under Packs.
-
Pick the interface language
Open Settings (Ctrl + ,), then Appearance, then Language. Details in Language and text direction.
The workspace: where is it kept?
Everything you write lives in one folder on your computer: a SQLite database and your attachments. No account and no cloud are needed.
- Folder
Worldsinside the Windows application data folder, usually%APPDATA%\Worlds- Database
worlds.db- Attachments
- The
attachmentssubfolder - Backups
- The
backupssubfolder
To open the folder: Settings, then Storage, and on the Data folder row press Show in Explorer.
The app has no option to move the folder somewhere else. Do not move or delete the files by hand while Worlds is running. For backups, use the method in History and backups.
To work with other people or across your devices, see Sharing and Sync.
The sample workspace
The sample workspace is a first-year student's week, in Arabic and English together. It is made on your computer without a connection, and it lets you try every kind of content before you start your own work.
Everything sits under one page called "مساحة طالب تجريبية · Sample student workspace", which holds:
- خطة الأسبوع · Weekly plan: a page with a table and a checklist.
- تقرير: الطاقة المتجددة · Report: Renewable energy: a document with an Arabic body and an English summary.
- درجات الفصل · Term grades: a spreadsheet with formulas on two sheets.
- رسم الخلية النباتية · Plant cell sketch: a drawing.
- دورة الماء · The water cycle: a presentation.
- The subjects الأحياء · Biology and الرياضيات · Mathematics, with classes, lessons, assignments, a midterm exam and something to bring, plus tasks and a calendar event.
Loading it
- From the empty Home: Load sample workspace.
- Or from Settings, then Storage: in the Sample workspace group press Load.
Loading it turns on the Study pack if it was off. Loading it twice does not duplicate it; you see the message "The sample workspace is already here".
Removing it
In the same place in Settings press Remove, then confirm with Move to Trash. Its pages, subjects, tasks and events move to Trash, including anything you added inside them. Your other pages stay as they are.
The sidebar
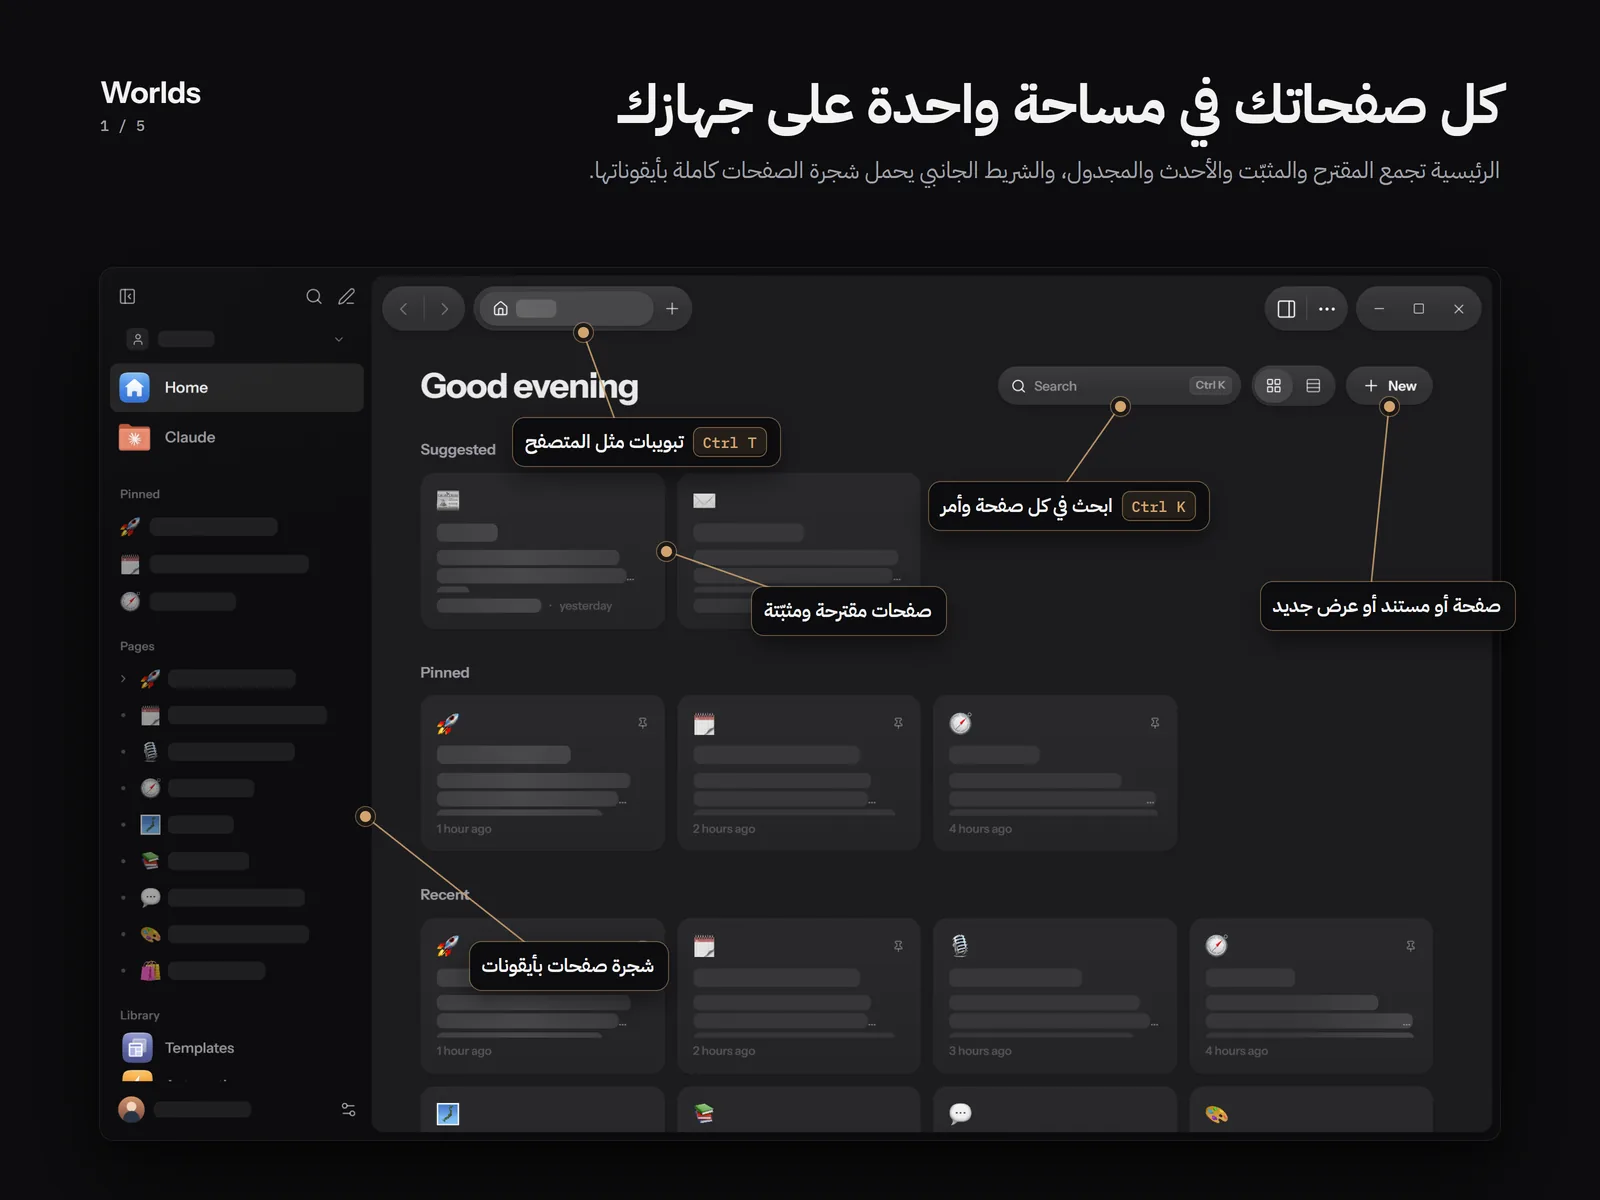
Top of the sidebar
- Hide sidebar: hides it. The shortcut that works is Ctrl + Shift + L.
- Search: opens search and commands (Ctrl + K). See Search and commands.
- New: the create menu. See Creating a resource.
Navigation
Home, Tasks, Calendar and Inbox, then Study if the Study pack is on, then Claude. Needs approval appears only when something is waiting for your approval.
Sections
- Pinned: appears only once you pin a page.
- Pages: your page tree, with a + button called New page.
- Subjects: only with the Study pack.
- Library: Templates, Automations, Integrations, Activity and Trash.
The page tree
- Hover a page to see the More and New subpage buttons. The arrow next to a page expands or collapses it.
- Dragging: drop a page on the top part of another page to put it before, or on the bottom part to put it after. To put it inside, hold it over the middle of the target for a moment (about a third of a second), then drop.
- Keyboard: Up and Down arrows to move, Right and Left arrows to expand and collapse, Enter to open, and F2 to rename (Enter saves, Esc cancels).
- Ctrl + click opens the page in a new tab, and Alt + click opens it on the right, next to the current page.
Right-clicking a page opens its menu: Open, Open in New Tab, Open Right, Open Left, New Subpage, Pin, Favorite, Rename, Duplicate, Move to, Share, Save as Template, Archive, Delete.
Move to lists Top level and the pages you opened most recently. Delete moves the page to Trash and shows a message with an Undo button.
Home
Home is the first thing you see. At the top are the greeting, a Search box, a Layout switch between cards and a list, and the New button. Then come these sections, in order:
- Today: today's events and due tasks, an Add a task for today field, and an All tasks link.
- Study: only with the Study pack, with All subjects.
- Suggested: favorite pages, and pages edited recently that you have not opened yet.
- Pinned.
- Recent: the last 12 items.
- Scheduled soon: upcoming automation runs, with All automations.
- Templates: up to 6 templates, with All templates.
Tabs work like a browser: Ctrl + T opens a new tab on Home, and Ctrl + W closes the tab.
Language and text direction
Interface language
In Settings, then Appearance, then Language, choose between:
- Automatic: follows the Windows language.
- English.
- العربية (Arabic).
Changing the interface language does not change what you wrote. Every page keeps its own text direction. A few words in the Arabic interface still show in English because they are not translated yet.
Paragraph direction
Each paragraph follows the direction of its text: an Arabic paragraph runs right to left and an English one left to right, even on the same page. To change the direction of one block, click its block handle, then Text Direction, and choose Automatic, Right to Left or Left to Right. This option is only on text blocks. See The block handle.
In Settings, then Editor, you also find Spell check. The other settings are in Settings.
What works where
| Feature | Windows | Apple (iPhone, iPad, Mac) | Android |
|---|---|---|---|
| Home and sidebar as on this page | Yes | The app's own layout | The app's own layout |
| Sample workspace | Yes | No | No |
The Apple and Android apps are still in progress and have their own feature sets. Their status is in Install.